In the past three years that our service is up and running, we have been repeatedly asked to include functionality for guest billing. I am happy to announce that as of today, this is part of our service.
Adding Βilling wasn’t easy and it is not the technical part that I am referring to. Billing/Invoicing is subject to different rules depending on the country a lodge is operating. Some of the rules are just common practice, while others are dictated by the country’s laws. For this reason, we do not consider the new functionality as complete. It is beta. And it will rather stay beta for some time, till we feel confident that we are addressing all the major requirements for a global service.
So, we are introducing Billing with English interface only, and free for a month, in order for our clients to see it, test it and use it and send us feedback. Within this period we will be collecting new requirements, prioritizing them and translating the module to the languages we currently support.
The rest of this post is an introduction about how to use this new functionality.
1. Initial Setup
To start issuing bills or invoices you need first to enter the information about the billing entity as it will appear on the bills/invoices. This is an one time setup (From the Billing Settings menu) and changes only when the billing entity details change. For EU countries, lodges registered for VAT, should add this piece of information here. If you omit the setup, then this piece of information will default to the name and address of the lodge.
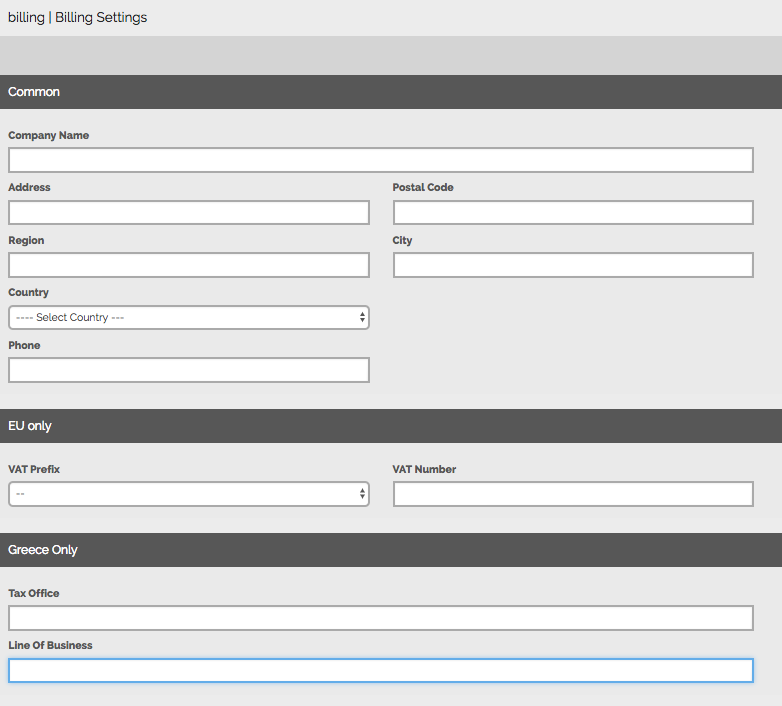
The initial setup screen will show up if you click on any other billing related menu item for the first time, or attempt to issue an invoice from a reservation.
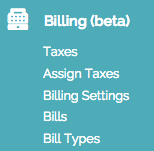
2. Bill Types
Then you need to decide what type of documents you will be using (use the Bill Types menu). For instance, a bill for all guests that visit and stay privately or an invoice for business guests. The bill type definition form has a checkbox to differentiate between the two. If you check the checkbox, then the type defined will be an “Invoice” and will include extra fields for Company name, Address, VAT number etc.
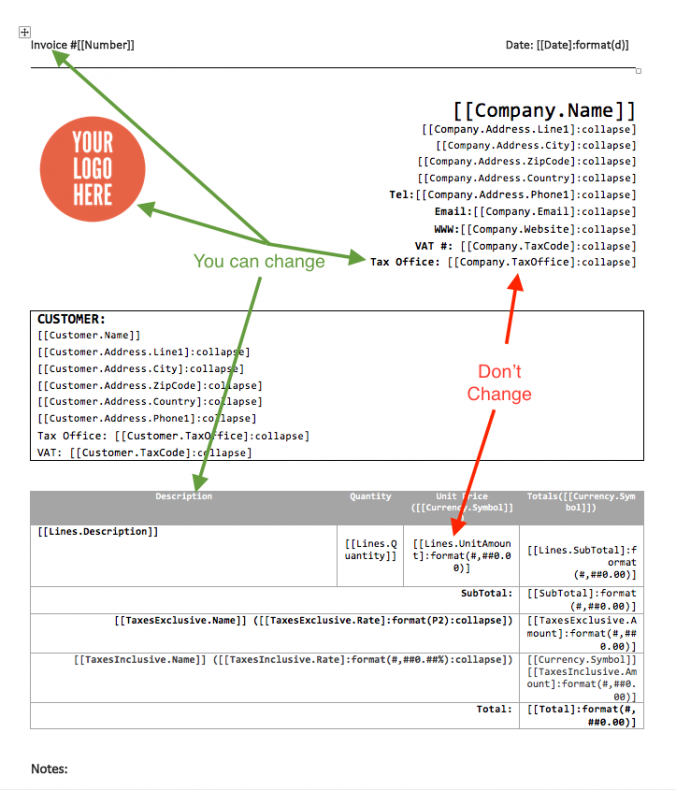
In the bill type definition, there is also a template field. The template is a prototype of how the bills will look like. We are adding automatically such a template to each new Bill Type but you will want to download it, edit it to, at least, include your logo (it is just a Microsoft Word file), and, probably, add some wording of your choice. Once finished you must upload it again to the bill type to make it the default template for this type. If you change the template, the past invoices will not be affected. Only an editing action on a pre-existing invoice will apply the new template to the old bill.

3. Defining and assigning taxes
The taxes that will apply on the services billed, vary per country. You must define Sales or VAT related tax rates and then any other rates required (like Municipal or County tax etc).
Once you define a new tax, this becomes available to be applied either for the room charge, or for any other extra service you have defined. While all the defined will be available for you to pick from, in the room charge lines, extras need to be explicitly associated beforehand with the applicable taxes. This is what you do with the menu “Assign Taxes”.

4. Issuing bills and invoices
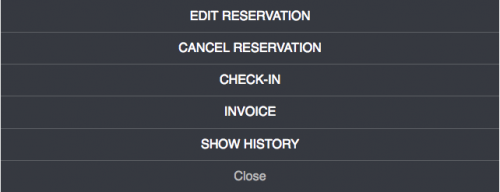
Normally, one would want to bill a customer at checkout. So, in the menu of the reservation there is a new menu item: “Invoice”. Clicking on it will create a draft bill.
You can change its bill type to the most appropriate.
Bill lines are prepopulated with a system set description. You can edit the description to whatever you want.
Also, each line allows you to pick the applicable taxes from the list that you have defined in step 3. Adding or removing a tax rate, recalculates the tax and net amounts amount automatically.
You can also add client specific notes in the end of the bill. There are two kind of notes: those that are only for you to read and notes that will be published on the bill, that are for the client to read.

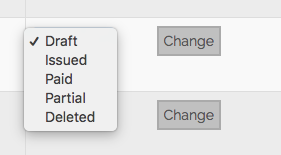
5. Bill Lifecycle
A freshly created invoice is in draft state. This means that no invoice number has been generated yet. Changing the bill status from Draft to Issued generates a number and the bill is considered issued. Issued means not paid yet. Alternatively, you can change the status to Partial of Paid, depending on whether you have received a partial or full payment. Since we do not have a separate payment system yet, you can record payment details in the notes field. In the future, when the payment system is activated, you will be able to record the payments in a more automated and structured way.
In all states of the lifecycle, you can produce a printable copy of the bill in the form of a pdf file. You can save these files, send them by email to clients or simply print them and discard them.
There is a permanent url that you can sent to clients to download the bill from.
If you have issued a bill and you want to cancel it, change its state “Void”. The cancelled bill will still show in the lists and will retain the number it has been given, for audit purposes.
If a bill is in Draft state, you can delete it completely by changing the state to “Deleted”. This will remove the draft bill from the bill list and will allow you to re-create the bill from the reservation menu.
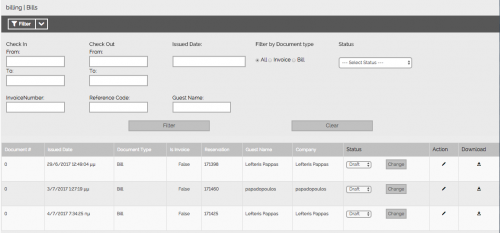
6. Lists and Filters
All documents created (bills or invoices) can be accessed from the menu item: “Bills”. You can filter this list by:
- Bill type
- Checkin/Checkout dates
- Reservation reference code
- Guest name
- Issue date
- Document number
- Status
7. Templates
The bill templates are word files with special code inside them, that points to the proper information that needs to be copied.
You can edit a template by changing the place of the fields on it, changing font, translating wording and adding images (like a logo).
There are two things you should not change, otherwise the template will break.
- anything that is inside square brackets
- if a field (the ones in brackets) is on table cell and has the word ‘collapse’ inside, it should stay on a table cell.
The billing functionality is accessible only from the web app and not the mobile apps.
We look forward to your suggestions and feedback. As always, do not hesitate to contact us whenever you have questions.
Comments are closed